
If you are using a 3Shape scanner, skip to step 9. For iTero, Dexis, or Medit scanners, skip this whole section.
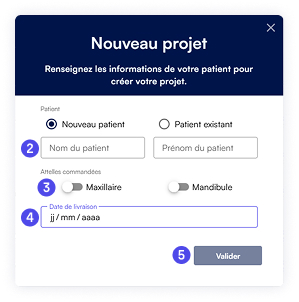
1. Click the New Project button in the left‑hand menu.
2. Fill in the patient’s First name and Last name.
3. Choose the type of fixed retainer for : Upper (Maxilla) or Lower (Mandible)
4. Select the desired delivery date.
Always allow at the very least 2 days between the delivery date and the planned fitting date.
5. Click Confirm.
Delivery time is 5‑7 business days.
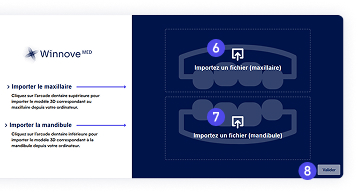
You will now move to the STL‑import page:
6. Upper Maxilla STL – upload the upper‑arch file.
7. Lower Mandible STL – upload the lower‑arch file.
8. Click Submit.
If you are using the 3Shape scanner, your project has already been created and the STL files are imported. The order status will read “To Complete” (see the article Order Steps).
 9. To open the prescription, click the project row in the list.
 10. hen click View
 ![]() in the bottom‑right side panel.
in the bottom‑right side panel.
You are now in the project editor. In the right‑hand side panel you will find the actions needed to place the order:
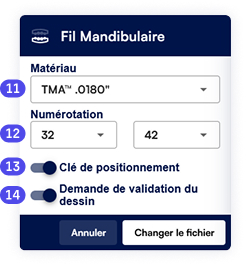
11. Select the retainer wire type.
12. Enter the prescription details.
13. Tick the box to receive the key transfer.
14. Tick the box to approve the design before production.
 15. Finish by clicking Order Retainers
 ![]()
- As long as the design has not been generated, you can at any time click Edit Prescription![]() - Tip: If you frequently use the same prescription, you might want to check the box to save your prescription settings before ordering.
- Tip: If you frequently use the same prescription, you might want to check the box to save your prescription settings before ordering.